In this article, I will show you how to create RESTful CRUD (Create, Retrieve, Update, Delete) APIs with Node.js, Express and MongoDB. We will be creating a simple posts api, Where user can create, edit, update and retrieve a post.
Express is the most popular framework for Node.js. Express is a minimal and flexible Node.js web application framework that provides a robust set of features for web and mobile applications.
MongoDB Atlas is a NoSQL and document based cloud database, which means it stores data in JSON-like documents. We believe this is the most natural way to think about data, and is much more expressive and powerful than the traditional row/column model.
Mongoose is an Object Data Modeling (ODM) library for MongoDB and Node.js. It manages relationships between data, provides schema validation, and is used to translate between objects in code and the representation of those objects in MongoDB. We will use mongoose for interaction between Node.js and MongoDB.
You can find the complete code of the application explained in this article in below Github Repository
Prerequisite
To proceed with the development, you should have installed Node.js in your system. If not, Please download Node.js and install it in your system,
To check whether the Node.js is installed successfully, go to your CMD terminal and run
node -v command. If you see the node version, its installed successfully.
I assume you have basic JavaScript knowledge to understand the development.
Lets start
Open your CMD terminal/ Git bash,whichever you prefer. I am using bash. Go to your workspace folder and create a new folder for the application by running the below command.
mkdir crud-apis
It will create an new folder named crud-apis inside the current folder. Now, go inside that folder and initialize the app with
packajge.json file using the following commands.cd crud-apis
npm init
It will ask give basic questions like package name, version, description, entry point, test command, git repository, keywords, author, license. If you want to give your custom input, you can give else just give Enter for all the questions for the default values. In the end, it will ask
Is this OK? (yes) , for that type yes and press enter. It will create an package.json file inside the project folder.
If you are Ok with default details and avoid giving enters for all the steps above. You can simply give the below command.
npm init -y
The above command will directly create the package.json file without any extra work (Time Saver). Now, open your project folder with any code editor you like. I use VS code, to open it with VS code from bash. Just run the
code . command. It will open VS code with the current folder and it files. If you created the package.json file with the default informations,package.json file will look like below.

Install dependencies
We will install the required dependencies for development. We need Express, Mongoose and also i am going to install dotenv package, this package will help to access the value stored inside
.env file. I am going to store the secret keys inside the .env file. To install packages run the following command.npm i express mongoose dotenv
After, You installed the packages, your
package.json file will look like below
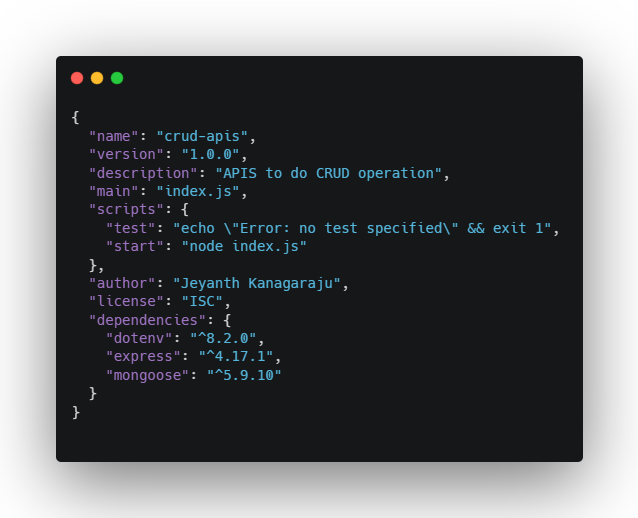
I have added few details in the json file like description, author. you will also notice, a new folder called
node_modules created in project folder. It will contain the installed packages. This folder store the modules needed for our project. The folder contains every installed dependency for your project.Lets create the server
We are going to create the main entry point of our application. Create file called
index.jsin the project folder. In the package.json file, by default it will take the index.js as the main file. You can see in the json file "main”:”index.js” . You can name it, whatever you want like server.js or main.js . But, I am going with the default name index.js . We need to import express inside index.js file to create the server. I have imported and added the required code in file to create and run the server. Please check index.js file below.

The above code is actually an worker server. Now, go to the terminal and run the following command
node index.js
It will give the console message
app running successfully in the port 5000 . As, we mentioned the const port = process.env.PORT || 5000 . It will take http://localhost:5000/ for development. You can see, i mentioned process.env.PORT , this line will take care, if i deploy the application to any live server, it will automatically take that server url as the application url. If, its in development local server, it will pick the http://localhost:5000/ as the application url.Lets create routes


In the above image, I have added new lines of code for routes. Basically, As an api, you will have GET, POST, PUT, DELETE, PATCH methods to make the api calls. The above route is using GET method. It route method will take arguments, the first one is path and second one is handler. In the route, i gave the default application route and in the handle, i passed the anonymous function, which has two parameters req and res. req is for request and res is for response. In the path, i am sending a message “Hello there” When the user calls this path. It will show “Hello there” as response. You can test this in browser. Run the app command
node index.js and open http://localhost:5000 in the browser. It will show “Hello there”.Lets configure and connect to the Database
To create a Database, go to Mongo Atlas and create an account and follow the steps in the documentation. Its very simple and straight to create a DB in Mongo Atlas. Once you created, you will get an URI to connect it with the application. Now, we need to import mongoose inside the
index.js file to connect the app with Mongo Atlas.

In the above code, I have imported mongoose and dotenv inside
index.js file and added the syntax to connect with Mongo Atlas. Now, create .env file inside project folder and paste the Mongo URI, which you generated, while creating database in the Mongo Atlas as shown below

To access the
.env file, we are importing the dotenv/config inside the index.js . You can use any name, i named it as DB_CONNECTION . In the index.js file, inside the mongoose syntax, i have added the line process.env.DB_CONNECTION . So, whatever name you are giving for the URI in the .env file. You need to pass the same name inside index.js. We will be getting promise response from the mongoose connection. So, I have added console message. If its connected suuccessfully, it will display DB connected else it will show error. Now, start the app and check. It will displayapp running successfully in the port 5000
DB connected
Lets create modal
I don’t want to create too much of code inside
index.js . So, lets create a new folder called modal inside the project folder and create file Posts.js inside the modal folder and the code as shown below.

Inside the
Posts.js import mongoose as we going to create mongoose schema. As, the APIs are going to be posts based. We are going to create three fields title, which will be String type and i am making it as required field and description, it will be also an String type and another one postedOn field, which will Date type and by default it will take current date. In the end, i am exporting this module to import it in other files. Please check the Mongoose Official Docs to know more about schema’s.Middlewares
Middleware functions are functions that have access to the request object (
req), the response object (res), and the next function in the application’s request-response cycle. The next function is a function in the Express router which, when invoked, executes the middleware succeeding the current middleware. To know more about middlewares.
Lets create middlewares for our app in
index.js . We need middleware in our app to parse the data. By default, whenever we call an GET or POST method in api, application won’t parse the data to JSON to do that we need to add an middleware.

In the above
index.js file, i have added a line app.use(express.json()) . To use middleware in express. We need to add app.use(path, handler) method. As we need the middle ware to parse the data for all the routes, we didn’t specify any path, so, it will take care all the path and whenever a path is called it will parse the data, which is passing through the path.Lets create more routes
I don’t want to create all the routes inside the
index.js file. For more readability. We will create a new folder called in the project root folder and create a file called posts.js . We will be creating all the application routes inside posts.js

Lets dissect the above file, we have imported express to use the router method from express and we have imported Posts modal from
/modal/Posts.js after that defined the POST, DELETE, PATCH, GET methods for the actions and in the we have exported the router module . Lets see each method one by one.

In the above route, we are calling the modal Posts and using the
find() method provided by mongoose, we are getting all the data from the database. If we pass any id inside the find(id) method, it will only get the specific data. It will give an promise response, if the response is success, it will give 200 success respose code with all the response data, else it will give 400 error response code with error message.

In the above route image, we are doing an POST request to create an new post. In the request body, we will pass the data, which is title and description and we are passing it to the post variable and
.save() will save the received data in the database. This will also give an promise response, if success, it will give 201 created response code with the created data response else it will give err as said above.

In the above route image, we are using DELETE method to delete a specific post. While making the API call, we need to pass the id of the item in the end of the url. We will get that id using
req.params.id and using the .remove({_id: id}) , we should be able to remove the specific post from the database. .remove({_id: id}) will take object as an parameter. So, we need to pass the id key and value. This, will also give an promise response success and error as said above.

In the above route image, we are using GET method to get specific post by passing the id of the post in the api. Using
req.params.id , we are getting the id from the api and using the .findById(id) , we are getting the specific post. This will also give promise response with success and error response.

In the above route image, we are using PATCH method. Using this method, we should be able to update an specific post by passing the post id in the api. We have an method called
.updateOne() , which will take the id object and the data to update as parameter. Using this, you can update single field like only title or description or both. This also give an promise response with success and error details.Importing the router inside index file


In the index file, we need to import the router to connect with index file. We use middle for routing. Using the middleware
app.use("/post", postRouter) , whenever user access an posts api, we are adding the word post in the end of the api endpoint.
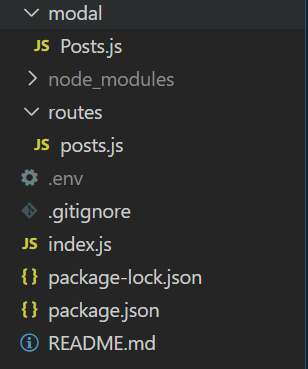
Below is the screenshot of complete folder structure of the application

Following are the APIs we created
- GET http://localhost:5000/post (To get all posts)
- POST http://localhost:5000/post (To create a new post)
- GET http://localhost:5000/post/:id (To get a specific post)
- DELETE http://localhost:5000/post/:id (To delete a specific post)
- PATCH http://localhost:5000/post/:id (To update a specific post)
We will see the APIs in action below using Postman.
To create a new post

In the above GIF, We are creating a new post using POST method, I am making the
Content-type: application/json and creating JSON data with title and description and firing the API. It’s giving an success response with 201 successfully created status code with created data. In the data, If can _id field, the MongoDB will automatically create an id by default for each post we are creating and also created time will automatically stored in postedOn field.
To get all posts

In the above GIF, we are using GET method to get all the created post. I created few posts, while making the GIF image, so it showing more.
To get a specific post

In this one, We are using GET method to get a specific post. In this API call, we are passing the id of an particular post in the API url and firing it. It’s getting successfully the specific post which belonged to the passed id
To delete a specific post

In this one, We are using DELETE method, to delete a specific post by passing its id in the url. At first, I am taking the id of the Post three and passing it to the url and firing it. It gives an success response. Then, again I am calling the API using GET method. The Post three is no more. It’s getting only two posts.
To update a specific post

In this one, I am updating a specific post using PATCH method, by passing id of the post in API url. I am copying the id of the Post one and pasting in the url and adding the Body content, with different title and firing the API. It gives an success response. Again, I removing the id from the url and changing to POST method and calling the API. In the response, title of the specific post is updated to new one.
Comments
Post a Comment